#410 Ember Part 2 pro
- Download:
- source codeProject Files in Zip (84 KB)
- mp4Full Size H.264 Video (26.8 MB)
- m4vSmaller H.264 Video (14.9 MB)
- webmFull Size VP8 Video (20.6 MB)
- ogvFull Size Theora Video (32.7 MB)
In this episode we’ll continue our look at Ember.js. If you missed part 1 of this series it’s a good idea to take a look at it before reading this one. In that episode we implemented the client-side behaviour of a Raffling application which allows us to enter a number of names and then draw random winners from them.

None of the server-side functionality has been implemented yet so if we reload the page after adding some names they will disappear. We need to persist the entries to the database through our Rails application to keep the data in sync.
Saving Data
We know that we need to store the entry records in the database and to provide a JSON API so that we can interact with it. We’ll start by creating an entry resource with name and winner attributes. When we run the generator for this resource it creates more files than we’d expect it to. This is because ember-rails gem taps into the generator and creates more files under the /app/assets/javascripts directory to deal with the resource, including a handlebars template which conflicts with the one we already have. We’ll say “no” when the generator asks us if we want to overwrite this file. When the generator finishes we’ll migrate the database so that the new database table is created.
$ rails g resource entry name winner:boolean
$ rake db:migrate
If we look in our application’s javascripts directory we won’t find any new files there, but in almost every one of its subdirectories we’ll find generated files. A lot of these conflict with what we’ve already created as the generator doesn’t assume that we’ve already implemented the client-side behaviour. For example we now have a entries_controller.js file as well as our entries_controller.js.coffee file. We’ll remove most of these as we already have our client-side behaviour in place.
$ rm app/assets/javascripts/controllers/entries_controller.js
$ rm app/assets/javascripts/controllers/entry_controller.js
$ rm app/assets/javascripts/routes/entry_route.js
$ rm app/assets/javascripts/templates/entry.handlebars
$ rm app/assets/javascripts/views/entries_view.js
$ rm app/assets/javascripts/views/entry_view.js
One generated file we have kept is the entry model. This contains a class which inherits from DS.Model and specifies the model’s attributes.
Raffler.Entry = DS.Model.extend({
  name: DS.attr('string'),
  winner: DS.attr('boolean')
});
The DS.Model class is defined in Ember Data. This is currently a separate project from Ember.js but is included in our Rails application through the ember-rails gem. This model handles the communication with our Rails application and sync the data over the API. Its defaults are compatible with Rails resources so we don’t need to do any configuration here. We still need to define the JSON API in our Rails app and we’ll do this in the newly-generated EntriesController. This API isn’t really the focus of this episode, so we won’t discuss its details.
class EntriesController < ApplicationController
  respond_to :json

  def index
    respond_with Entry.all
  end

  def show
    respond_with Entry.find(params[:id])
  end

  def create
    respond_with Entry.create(params[:entry])
  end

  def update
    respond_with Entry.update(params[:id], params[:entry])
  end

  def destroy
    respond_with Entry.destroy(params[:id])
  end
end
There’s nothing unexpected here, just five of the standard seven RESTful actions, each of which responds with some JSON. There’s more going on behind the scenes here as the ember-rails gem also includes Active Model Serializer, which we covered in episode 409. Our app now includes a serializers directory which contains an EntrySerializer. This defines the data that is returned from the JSON API.
class EntrySerializer < ActiveModel::Serializer
  attributes :id, :name, :winner
end
Note that Active Model Serializers aren’t necessary to use Ember, we could generate the JSON however we like.
Now that we have the server-side code in place we’ll focus back on the client side. We have an Entry model here but we aren’t using it anywhere in our code. We’ll fix this now, starting with our router, where we populate the initial entries array. This is currently set to an empty array but we should fetch the records from our Rails application and populate the list from there. We can do this by using our model and calling find on it.
Raffler.EntriesRoute = Ember.Route.extend
  setupController: (controller) -> controller.set('content', Raffler.Entry.find())
This returns an empty result object initially but it will query our Rails application and populate the data that is returned and bind it as necessary. This line of code is getting a little out of hand and there’s a more concise way to do the same thing by setting the model property directly so we’ll do that instead.
Raffler.EntriesRoute = Ember.Route.extend
  model:  -> Raffler.Entry.find()
This does the same as the other code and populates our EntriesController with the data. Talking of our controller there are a few more changes we need to make there. When we add an entry we currently just create an Ember.Object but we want this to be an Entry record. We can call createRecord to do this.
Raffler.EntriesController = Ember.ArrayController.extend
  addEntry: ->
    Raffler.Entry.createRecord(name: @get('newEntryName'))
    @set('newEntryName', "")
Note that we no longer need to call @pushObject on this as Ember Data will automatically add this to the Entries result. We also need to make a change to the code that runs when we draw a winner and push the changed data to our Rails app.
drawWinner: ->
  @setEach('highlight', false)
  pool = @rejectProperty('winner')
  if pool.length > 0
    entry = pool[Math.floor(Math.random()*pool.length)]
    entry.set('winner', true)
    entry.set('highlight', true)
    @get('store').commit()
We do this by using @get('store') which is a property on our controller for accessing the Ember Data store and call commit() on this to save the changes. We can test this now to see if it works. If we reload the page, add a name then click “Draw Winner” we expect it to persist when we reload the page again, but it seems not to work. If we look at the development log we’ll see that Ember is trying to access a route called /entrys which is obviously wrong. We’ll need to tell Ember Data how to pluralize “entry” and we do this in the store CoffeeScript file.
Raffler.Store = DS.Store.extend
  revision: 11

DS.RESTAdapter.configure("plurals", entry: "entries")
When we add some entries now and reload the page they persist like we’d expect.

Computed Properties
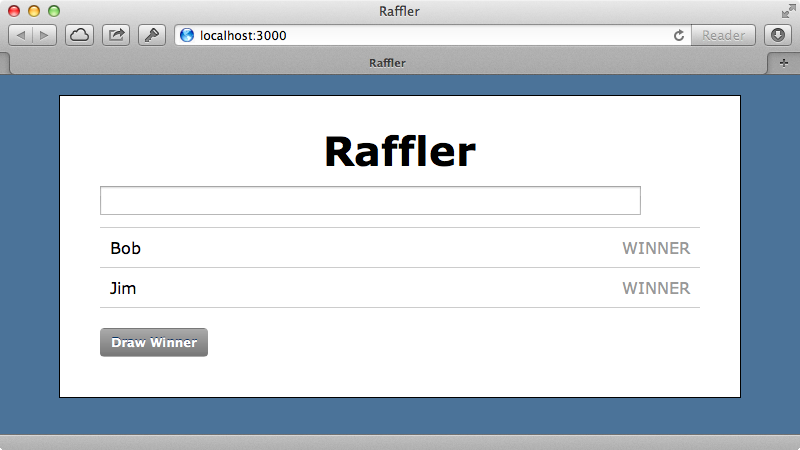
Now that our data is persisting we’ll show you a couple of other things that Ember can do. The first of these is computed properties. Currently we can click the “Draw Winner” button even after we’ve selected every entrant as a winner. We’ll modify this so that it’s disabled once every entrant has been picked. To do this we’ll add a disabled attribute to the button that’s set dynamically once there are no more entries available to pick. To make a dynamic attribute we use bindAttr to bind it to a property and we’ll use one called allWinners. This property will be checked on the controller and if it’s true the button will be disabled.
<button {{action drawWinner}} {{bindAttr disabled="allWinners"}}>Draw Winner</button>We’ll create this property on the controller and while we could set this to a static value we want to make this a computed property that updates the view automatically whenever our entries change so we’ll make it a function instead.
allWinners: (->
  @everyProperty('winner')
).property('@each.winner')
Ember makes detecting whether every entrant is a winner easy by providing an @everyProperty function. If we pass this the winner property it will return true if all the entrants are winners. Calling this directly won’t work, though, and we need to convert the function into a property. We do this by wrapping it in parentheses and calling property() on that. This takes an argument that tells Ember when it should recalculate the winners and which should be a property of the object. We could have used newEntryName here and then whenever that property changed the winners would have been recalculated. We want the winners to be recalculated whenever any of the entries that have a winner attribute change and we do this by using @each which will check each of the entries within this controller’s array. Calling .winner on this means that whenever any of the winner attributes changes the winners will be recalculated. We can try this now and when we reload the page the button is disabled as we’ve already selected all the entrants as winners.

If we add another entry now the button will re-enable as there is now a new entrant. If we click it all the entrants will be winners again and the button will be disabled again.
View Objects
The last improvement we want to make to our application is to the new entry form. We currently have to press the return key to add a new entrant so we’ll add an “Add Entry” button next to the text field that can be clicked. One way to do this is to wrap the text field in a form tag and then add an input element with a type of submit after it. We can then move the addEntry action into this element.
<form>
  {{view Ember.TextField valueBinding="newEntryName"}}
  <input type="submit" value="Add" {{action addEntry}}>
</form>
This approach works. If our form is submitted either way now it triggers the action although it’s a little unclear what event Ember is listening to, it could be the click event on the button or the submit event on the form. If we want to add actions to other events such as a focus or blur event we can get more control over the events by making a view object. So far we’ve ignored the views directory but we’ll use it now and create a new_entry_view.js.coffee file here.
Raffler.NewEntryView = Ember.View.extend
  templateName: 'new_entry'
In this file we define a class which inherits from Ember.View. We set the templateName option here which means that Ember will look for a template with that name. We’ll move our form into this new template.
<form>
  {{view Ember.TextField valueBinding="newEntryName"}}
  <input type="submit" value="Add" {{action addEntry}}>
</form>
In our entries template we can include this view by calling view.
{{view Raffler.NewEntryView}}Another option we can pass into our view class is tagName. We’ll set this to form so that we can listen to events on this tag within the view.
Raffler.NewEntryView = Ember.View.extend
  templateName: 'new_entry'
  tagName: 'form'
This means that we don’t need the form tags in our template any more as the view will automatically wrap the template in that tag.
{{view Ember.TextField valueBinding="newEntryName"}}
<input type="submit" value="Add" {{action addEntry}}>
With all this in place we can now listen to events triggered on the form by defining a function with the same name as the event we want to listen to. We’ll write a submit function that will add the new entry to the form.
submit: ->
  @get('controller').send('addEntry')
  false
This function triggers the addEntry function on the controller. In it we fetch the controller by calling @get('controller') and use send on this to trigger a function. We then return false so that the form isn’t actually submitted. With this in place we no longer need the action on the submit button and we can remove it from the template.
{{view Ember.TextField valueBinding="newEntryName"}}
<input type="submit" value="Add">
Now when we add a name and submit the form by either hitting the return key or by clicking “Add” the new entrant is added to the list.
With this view object in place we could move some additional behaviour from the controller into the view, such as the code that reads the new entrant’s name from the text field and then clears it. If we pass the name in as an argument to addEntry then we could move this logic into the view.
addEntry: (name) ->
  Raffler.Entry.createRecord(name: name)
We can move update the submit function to pass the name to the controller and then clear the text field.
submit: ->
  @get('controller').send('addEntry', @get('newEntryName'))
  @set('newEntryName', "")
  false
This should work just like it did before except that we’re now using the property on our view object instead of in the controller. This means that we need to bind our template to the view object and we do this by calling the property on view.
<form>
  {{view Ember.TextField valueBinding="view.newEntryName"}}
  <input type="submit" value="Add" {{action addEntry}}>
</form>
If we’ve done everything correctly we should have the same functionality that we had before. We almost have except that we’ve lost the last record that we added. It seems that new entries no longer persist and what’s wrong is that we need to commit the store when we create a new record which we’ve overlooked.
addEntry: (name) ->
  Raffler.Entry.createRecord(name: name)
  @get('store').commit()
Now when we add a new entry and reload the page we see that it has persisted.
We’re pretty much done with our application now. We can add new entries and draw random winners with a button that is automatically disabled when all the winners are chosen. Our data also persists.
Ember.js is shaping up to be a interesting framework. It had issues earlier on including a lack of documentation and an unstable API but both of these are now fixed. There are still some issues with the surrounding projects, however. Ember Rails and Ember Data aren’t as stable or as well documented.
When you choose a client-side framework it’s a good idea to compare it with other options such as AngularJS, which was covered in episode 4053. Both of these frameworks feature powerful two-way binding which make it easy to keep the view in sync with the data. Angular’s approach to bindings feels like it leads to more direct and simpler code. That said you get more control over the bindings in Ember.
The Raffling app we’ve used for both of these episodes seems to favour AngularJS due to its simplicity and it doesn’t have any complex routing or state that needs to change which is one of Ember’s strong points. Ember has a steeper learning curve but the added structure that it provides can help keep larger applications maintainable.


