
#349 Rails Modularity pro
- Download:
- source code
- mp4
- m4v
- webm
- ogv
You’ve probably heard that Rails is a modular framework that allows us to only include the parts that we use, but it can be difficult to find examples in the documentation on how to do this. In this episode we’ll start from the ground up and show how the smallest Rails application works. Later we’ll approach things from the other end with a full Rails stack and trim off what we don’t need.
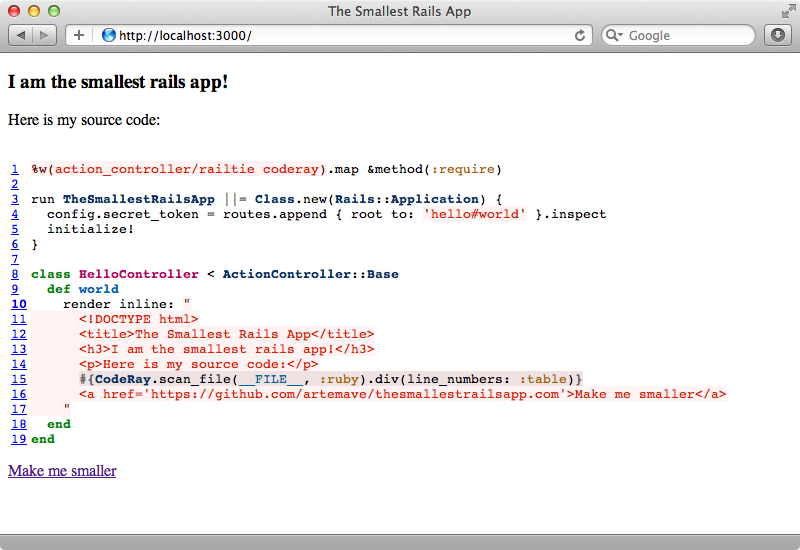
The smallest Rails application can be found here and all it does is print its own source code. We’ll run this app on our local machine and play around with it to better understand how it works. It uses Coderay for syntax highlighting so we’ll need to install this first.
$ gem install coderay
Next we’ll create a config.ru file to put the application’s code in. This is what’s known as a Rackup file (if you’re not familiar with Rack take a look at episode 317). We’ll copy the source code from the site into this file.
%w(action_controller/railtie coderay).map &method(:require)

run TheSmallestRailsApp ||= Class.new(Rails::Application) {
  config.secret_token = routes.append { root to: 'hello#world' }.inspect
  initialize!
}

class HelloController < ActionController::Base
  def world
    render inline: "
      <!DOCTYPE html>
      <title>The Smallest Rails App</title>
      <h3>I am the smallest rails app!</h3>
      <p>Here is my source code:</p>
      #{CodeRay.scan_file(__FILE__, :ruby).div(line_numbers: :table)}
      <a href='https://github.com/artemave/thesmallestrailsapp.com'>Make me smaller</a>
    "
  end
end
To run this application we run rackup, passing in the -p option to change the port number.
$ rackup -p 3000
When we visit http://localhost:3000 now we’ll have the smallest Rails app running on our local machine.
We’ll expand out the code for this application a little to get a feel for how it works as it’s filled with neat little tricks. We’ll start with the first line.
%w(action_controller/railtie coderay).map &method(:require)
This line requires both action_controller/railtie and coderay. You’re probably familiar with Symbol#to_proc which lets us pass a symbol to a block, well this is Method#to_proc where we pass a method to a block. This line of code will call require and pass it any arguments that are passed to the block. We could expand this out by using an actual block like this:
%w(action_controller/railtie coderay).map {|f| require f }For clarity’s sake we’ll stick to the traditional approach and call require directly.
require 'action_controller/railtie'
require 'coderay'
Next, we have something else we don’t see very often: a call to Class.new. This will create an anonymous class that inherits from the class we pass into it, in this case Rails::Application.
run TheSmallestRailsApp ||= Class.new(Rails::Application) {
  config.secret_token = routes.append { root to: 'hello#world' }.inspect
  initialize!
}
This class doesn’t stay anonymous for long as it’s assigned to a constant called TheSmallestRailsApp. We then run this application. Another way to write this is to use the class declaration and create a class that inherits from Rails::Application.
class TheSmallestRailsApp < Rails::Application
config.secret_token = routes.append { root to: 'hello#world' }.inspect
initialize!
end
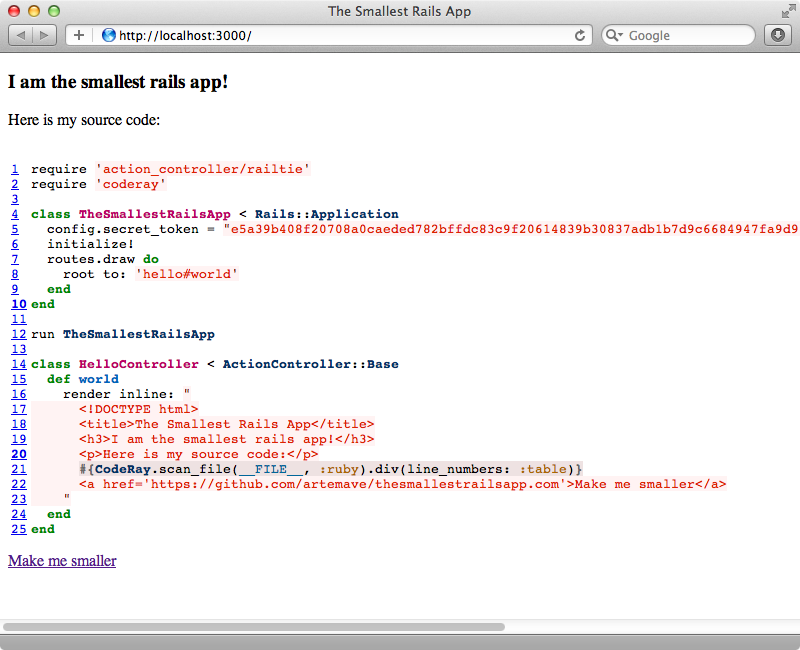
run TheSmallestRailsAppWe’re able to run this as a Rack application because our class inherits from Rails::Application, which is a Rack app. In this class we set config.secret_token to the routes which we call inspect on. This is a bit of trickery as this line of code does two things at once. First we’ll look at the routing. The routes.append method works similar to routes.draw, but doesn’t work before the application is initialized which is why its used here. Every Rails application’s routes file calls routes.draw; the rest of the routing should be familiar. As for the secret_token this needs to be set to a long string or else the application won’t start up. It’s usually set to long string of characters so that’s what we’ll do here.
class TheSmallestRailsApp < Rails::Application
  config.secret_token = "e5a39b408f20708a0caeded782bffdc83c9f20614839b30837adb1b7d9c6684947fa9d986d2882188925ab2dd22fb6c8724821f28f47d5d410272aaa868e21aa"
  initialize!
  routes.draw do
    root to: 'hello#world'
  end
end

run TheSmallestRailsApp
The rest of the application should be easy to understand: it’s just a controller with a world action which renders out the content of a string including the contents of the source code file which are syntax-highlighted with Coderay. This action is set up as the root URL in the routes file.
class HelloController < ActionController::Base
  def world
    render inline: "
      <!DOCTYPE html>
      <title>The Smallest Rails App</title>
      <h3>I am the smallest rails app!</h3>
      <p>Here is my source code:</p>
      #{CodeRay.scan_file(__FILE__, :ruby).div(line_numbers: :table)}
      <a href='https://github.com/artemave/thesmallestrailsapp.com'>Make me smaller</a>
    "
  end
end
Whenever we make any changes to this file we’ll need to restart the app so that they’re picked up. When we reload the page now it works as it did before but it shows our changed source code.
We don’t actually need a Rails application class to get this to work. We can use a controller directly as a Rack app like this:
require 'action_controller/railtie'
require 'coderay'

class HelloController < ActionController::Base
  def world
    render inline: "
      <!DOCTYPE html>
      <title>The Smallest Rails App</title>
      <h3>I am the smallest rails app!</h3>
      <p>Here is my source code:</p>
      #{CodeRay.scan_file(__FILE__, :ruby).div(line_numbers: :table)}
      <a href='https://github.com/artemave/thesmallestrailsapp.com'>Make me smaller</a>
    "
  end
end

run HelloController.action(:world)
This works and has the same behaviour as before; it just doesn’t go through a Rails::Application class. This doesn’t use the full Rack middleware stack so if we try to use cookies inside this controller it won’t work. Using a class that inherits from Rails::Application uses the full Rails application stack just like a full Rails application.
Creating a Controller and a View
So far we’ve been doing everything in a single file but Rails’ auto-loading behaviour is still there if we need it. We can create app/controllers and app/views directories and separate these parts of the smallest application out. We’ll start with the controller and move the controller code from the Rackup file into a new hello_controller.rb file.
class HelloController < ActionController::Base
  def world
    render inline: "
      <!DOCTYPE html>
      <title>The Smallest Rails App</title>
      <h3>I am the smallest rails app!</h3>
      <p>Here is my source code:</p>
      #{CodeRay.scan_file(__FILE__, :ruby).div(line_numbers: :table)}
      <a href='https://github.com/artemave/thesmallestrailsapp.com'>Make me smaller</a>
    "
  end
end
Instead of rendering the HTML inline we’ll move it out into a template. We’ll just have it render “Hello World” for now.
Hello World
We can now clean up our controller.
class HelloController < ActionController::Base
  def world
  end
end
This should go to show you how flexible Rails is. We can fit a Rails application is a single file or expand it out into multiple files easily.
Striping Down a Full Rails Application
We’ll take the opposite approach now, starting with a full Rails application and removing the parts that we might not use. We’ll create a new app called blog and generate some scaffolding for an Article model.
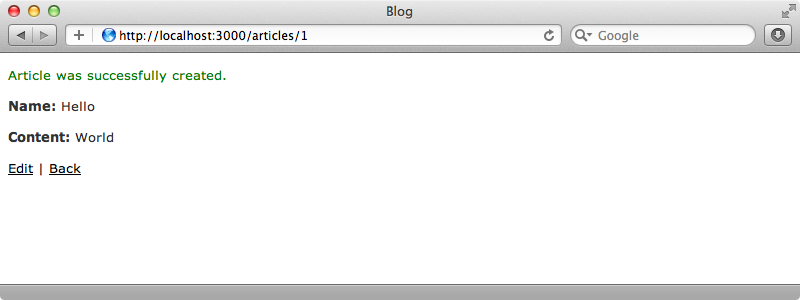
$ rails new blog
$ cd blog
$ rails g scaffold article name content:text
$ rake db:migrate
The first thing we can consider removing is the asset pipeline. A lot of Rails developers love this, though it’s not compulsory to use it. While it can feel a bit heavy in development it shouldn’t slow down an app in production at all if we pre-compile the assets. In fact it can often make a site feel faster due to its caching abilities. That said, it’s not to everyone’s taste and it might not be a good fit for a given application’s scenario. To remove it we’ll first need to go to the bottom of our application’s config file and set config.assets.enabled to false. We can also remove or comment-out any other lines of code that reference config.assets too.
# Enable the asset pipeline
config.assets.enabled = false

# Version of your assets, change this if you want to expire all your assets
# config.assets.version = '1.0'
At the top of this file we can configure the groups that Bundler uses. We want only the default and current environment’s groups to be used and not the assets group.
if defined?(Bundler)
  # If you precompile assets before deploying to production, use this line
  # Bundler.require(*Rails.groups(:assets => %w(development test)))
  # If you want your assets lazily compiled in production, use this line
  Bundler.require(:default, Rails.env)
end
We can also remove the assets group from the gemfile.
# Gems used only for assets and not required
# in production environments by default.
#group :assets do
#  gem 'sass-rails',   '~> 3.2.3'
#  gem 'coffee-rails', '~> 3.2.1'
#
#  # See https://github.com/sstephenson/execjs#readme for more supported runtimes
#  # gem 'therubyracer', :platform => :ruby
#
#  gem 'uglifier', '>= 1.0.3'
#end
There’s another change we need to make in the application’s configuration file. At the top of this file is the line require 'rails/all' and this will load all the Rails frameworks. If we were to replace this line with one that called each framework separately it would look something like this.
require "active_record/railtie"
require "action_controller/railtie"
require "action_mailer/railtie"
require "active_resource/railtie"
# require "sprockets/railtie"
require "rails/test_unit/railtie"
Now we can pick and choose the parts of Rails that we want to load. As we’re not using the asset pipeline we’ve commented out the sprockets railtie.
Since we can no longer use the asset pipeline to load jQuery we’ll need to generate the jQuery files which we can do by running the following command which will add them to the /public directory.
$ rails g jquery:install
Next we’ll need to move anything that we want to keep from the /assets directory into the relevant subdirectory under /public. Once we’ve done so we can remove /assets from our application. We’ve just created a new stylesheet at /public/stylesheets/application.css and copied the styles from the scaffold.css.scss file into it. Finally we’ll need to change the javascript_include_tag in the application’s layout file so that it loads in the necessary JavaScript files.
<%= javascript_include_tag :defaults %>If we look at our application is browser now it will work just as it did with the asset pipeline.
Removing Other Parts of The Framework
We can slim down our application even further by removing other parts of the framework that we don’t need. We aren’t going to use unit tests or ActiveResource and so we can remove these from the config file. Our application won’t be used to send email either and so we can remove ActionMailer as well and delete the app/mailers directory.
require "active_record/railtie"
require "action_controller/railtie"
# require "action_mailer/railtie"
# require "active_resource/railtie"
# require "sprockets/railtie"
# require "rails/test_unit/railtie"
When we remove parts of the framework like this we’ll need to watch out for configuration options that relate to the removed parts. For example we’ll need to remove the references to config.action_mailer in the development and test configuration files. Our application should still boot up like it did before and maybe even a little faster. Now we’re left with just ActiveRecord and ActiveController. If we don’t want a persistence layer we could remove ActiveRecord or use ActiveModel with our own persistence layer and we’ll take this second option here.
require "active_model/railtie"
require "action_controller/railtie"
# require "action_mailer/railtie"
# require "active_resource/railtie"
# require "sprockets/railtie"
# require "rails/test_unit/railtie"
Again this means that we need to go through our application’s configuration files but this time we need to remove any references to config.active_record. We can now remove the /config/database.yml file and the /db directory. We can also remove the reference to the sqlite3 gem from the gemfile. Our scaffolding will be completely broken now as it relies on the Article model which inherits from ActiveRecord::Base. For fun we’ll replace this class with one that uses ActiveModel and which defines an interface similar to ActiveRecord’s but which uses a primitive in-memory store.
class Article
  extend  ActiveModel::Naming
  extend  ActiveModel::Translation
  include ActiveModel::Validations
  include ActiveModel::Conversion
  attr_accessor :id, :name, :content

  def self.all
    @articles ||= []
  end

  def self.find(id)
    all.detect { |a| a.id == id.to_i }
  end

  def initialize(attrs = {})
    self.attributes = attrs
  end

  def persisted?
    @id.present?
  end

  def save
    if valid?
      unless persisted?
        self.id = self.class.all.size + 1
        self.class.all << self
      end
      self
    else
      false
    end
  end

  def attributes=(attrs)
    attrs.each { |name, value| send("#{name}=", value) }
  end

  def update_attributes(attrs = {})
    self.attributes = attrs
    save
  end

  def destroy
    self.class.all.delete(self)
  end
end
Let’s cross our fingers now and try this out. Our application still boots up and we can still create, edit and view articles through the scaffolding pages.
We now have a fully-working scaffolding that uses ActiveModel with in-memory persistence. Obviously we wouldn’t want to use this class in a production application but it works a demonstration of how we can use ActiveModel without ActiveRecord.
Let’s see what else we can delete. Other likely candidates are app/helpers, config/locales, /lib, /test, /vendor and /doc. None of these are really necessary unless we want to customize what’s in them. We can also remove the /config/initializers directory with a little work. Most of the files in it only contain comments. The two configuration options we do want to keep are the ones from the session_store and secret_token files and these can be moved into the application config file. We can then delete /config/initializers.
config.session_store :cookie_store, key: '_blog_session'
config.secret_token = 'bdf146e405f86c43237f9e16d9e17a0a6bf457779da67a798b9a70d01a5d7d1ef8d9cd35c61bc0d1645f3b546bcc768f58ac34c89021b7940d5c6ca9c2ab9115'
What about Bundler? We can safely delete the /Gemfile and /Gemfile.lock files without any bad side effects and our application will no longer use Bundler. Instead we just need to make sure that we load any necessary gems at the top of our application config file and keep an eye out for version dependency issues.
We’re pretty much done now. What do we have left? Under the /script directory we still have the rails script which is necessary to keep the rails command working. In the root we still have Rakefile so that Rake works and the config.ru file which, like the Rackup file we had in the smallest application, just runs our application. This file also loads the environment config file which calls initialize! on our application after loading it from /config/application.rb. The application config file loads the boot file, which doesn’t do anything except set up rubygems and Bundler, then loads the parts of Rails that we want and sets some configuration settings on our app. The rest of our application’s files are the models, views and controllers specific to our application.
Hopefully this will help you draw lines between the Smallest Rails Application and the full Rails stack and give you an idea as to how we can scale between them and add and remove the parts you need. One thing we didn’t talk about is the modularity within ActionController itself but this was covered in the previous episode on Rails::API.
