#135 Making a Gem
- Download:
- source codeProject Files in Zip (4.59 KB)
- mp4Full Size H.264 Video (14 MB)
- m4vSmaller H.264 Video (9.39 MB)
- webmFull Size VP8 Video (21.4 MB)
- ogvFull Size Theora Video (16.8 MB)
Nell’episodio 33 [ guradalo, leggilo ], abbiamo visto come fare un plugin per Rails. Una più popoleare alternativa per estendere le funzionalità di Rails è quella di creare un gem, ed è quanto vedremo in questo episodio.
Poniamo di voler poter generare un token unico per un modello ActiveRecord. Dato un modello con una colonna token, per esempio il modello Recipe di sotto, vogliamo poter chiamare un metodo di classe chiamato uniquify che imposti una callback di before_create in modo tale che alla creazione di una nuova ricetta, automaticamente si generi un token casuale e sia garantita l’unicità di quel token sul database:
class Recipe < ActiveRecord::Base
  uniquify :token
end
Creiamo un Gem
<<<<<<< HEADI Gem Ruby si possono creare da zero, ma ciò comporta un sacco di lavoro. Un modo più semplice prevede l’ausilio di un altro gem per la creazione dei nostri. Ne esistono tanti per questo scopo, fra cui hoe, newgem, bones, gemhub e echoe. La maggior parte di questi forniscono dei generatori per creare i file necessari in modo da dover solo riempire i dettagli del codice generato. Per gli scopi di questo episodio, creeremo questi file a mano e poi useremo il gem echoe per creare il package del nostro gem.
Prima di cominciare a scrivere il nostro gem, dobbiamo installare echoe. Lo si fa allo stesso modo di un qualunque altro gem:
sudo gem install echoe
Questo è tutto ciò di cui abbiamo bisogno per poter cominciare a scrivere il nostro gem. Cominciamo con il creare una cartella per il gem, che contenga un’altra cartella denominata lib:
mkdir -p uniquify/lib
Il nostro gem conterrà tre file:
README.rdocnel formato rdoc, in modo tale che si possa visualizzare correttamente su GitHub.Rakefile.uniquify.rbche conterrà il vero e proprio codice.
touch:
=======
Ruby gems can be made from scratch, but this involves a lot of work. An easier way is to use another gem to help create ours. There are several of these including hoe, newgem, bones, gemhub and echoe. Most of them provide generators that will create the necessary files so that all we have to do is fill in the details. For the purposes of this episode we’re going to create the files manually and then use the echoe gem to package our gem.
Before we start writing our gem we’ll need to install echoe. This is installed in the same way as any other gem.
sudo gem install echoe
That’s all we need to enable us to begin writing our gem. We’ll start by creating a directory for it which will contain another directory called lib.
mkdir -p uniquify/lib
Our gem will contain three files. We’ll use a README file (in rdoc format so that it renders correctly on GitHub) and we’ll also need a Rakefile and finally the Ruby file that will have the actual code in it. We can create these with touch.
cd uniquify
touch README.rdoc Rakefile lib/uniquify.rb
Per prima cosa occupiamoci del Rakefile. Questo file definisce il nostro gem:
=======We’ll look at the Rakefile first. This is where we define our gem.
>>>>>>> c81ad0f11156510782267dede52d82c62f1ecdearequire 'rubygems' require 'rake' require 'echoe' Echoe.new('uniquify', '0.1.0') do |p| <<<<<<< HEAD p.description = "Genera un unico token per ActiveRecord" p.url = "http://github.com/knightq/uniquify" p.author = "Andrea Salicetti" p.email = "andrea@asciicasts.com" ======= p.description = "Generate a unique token with ActiveRecord" p.url = "http://github.com/eifion/uniquify" p.author = "Eifion Bedford" p.email = "eifion@asciicasts.com" >>>>>>> c81ad0f11156510782267dede52d82c62f1ecdea p.ignore_pattern = ["tmp/*", "script/*"] p.development_dependencies = [] end Dir["#{File.dirname(__FILE__)}/tasks/*.rake"].sort.each { |ext| load ext }
Nel Rakefile usiamo echoe per definire il gem, passandogli il nome e un numero di versione. Nel blocco di echoe definiamo una serie di parametri per il gem. L’ignore_pattern definisce i pattern dei file che non vogliamo che siano inclusi nel gem. Non abbiamo le cartelle tmp e script nel nostro gem, ma le abbiamo messe a titolo di esempio. Abbiamo anche impostato il parametro development_dependencies ad un array vuoto, poichè di default echoe include se stesso come dipendenza. Normalmente questo non è un problema, ma potrebbe causarne con versioni più datate di RubyGems.
Infine includiamo una cartella tasks per ogni file .rake, in modo tale che possano essere caricati.
Il codice di Uniquify
Ora possiamo implementare le funzionalità del gem:
=======In the Rakefile we’re using echoe to define the gem, passing in a name and a version number. In echoe’s block we define a number of parameters for the gem. The ignore_pattern defines the patterns for the files we don’t want included in the gem. We don’t have tmp and script directories in our gem, but we’ve included them as an example. We’ve set the development_dependencies to an empty array as by default echoe includes itself as a development dependency. Normally this isn’t a problem, but it can cause issues with older versions of RubyGems.
Finally we check in a tasks directory for any .rake files so that they can be loaded.
The Uniquify Code
We can now implement the gem’s functionality.
>>>>>>> c81ad0f11156510782267dede52d82c62f1ecdeamodule Uniquify def self.included(base) base.extend ClassMethods end def ensure_unique(name) begin self[name] = yield end while self.class.exists?(name => self[name]) end module ClassMethods def uniquify(*args, &block) options = { :length => 8, :chars => ('a'..'z').to_a + ('A'..'Z').to_a + ('0'..'9').to_a } options.merge!(args.pop) if args.last.kind_of? Hash args.each do |name| before_create do |record| if block record.ensure_unique(name, &block) else record.ensure_unique(name) do Array.new(options[:length]) { options[:chars].to_a[rand(options[:chars].to_a.size)] }.join end end end end end end end class ActiveRecord::Base include Uniquify end
E’ convenzione inserire il codice all’interno di un module dello stesso nome del gem, per cui scriviamo il nostro codice in un module di nome Uniquify. Quando il nostro gem viene incluso in ActiveRecord, aggiungerà il metodo uniquify definito nel module ClassMethods. Questo metodo ha una callback before_create che genera il nostro token unico. Infine, includiamo il module Uniquify in ActiveRecord.
Ora che abbiamo scritto il codice, dobbiamo scrivere anche un po’ di documentazione. Va messa nel fiel README.rdoc che abbiamo creato poco fa:
= Uniquify

Gem Rails per la generazione di un token unico in un modello ActiveRecord.

(resto del file omesso).
Questo è tutto ciò che dobbiamo fare per creare un gem Ruby. La sola parte specifica della natura gem del progetto è nel Rakefile, nelle poche linee di codice relative a echoe.
Testing
Ora che abbiamo scritto il nostro gem come facciamo a testarlo e pubblicarlo? La risposta è di usare i vari task rake offerti. Poichè stiamo usando echoe, il primo task che dobbiamo lanciare è rake manifest:
It’s conventional to put a gem’s code into a module with the same name as the gem, so we’ve put ours into a module called Uniquify. When our gem is included into ActiveRecord it will add the uniquify method defined in the ClassMethods module. This method has a before_create callback which generates our unique token. Finally we include the Uniquify module in ActiveRecord.
Now that the code’s written we’ll need some documentation, too. This belongs in the README.rdoc file we created earlier.
= Uniquify

Rails gem for generating a unique token in an Active Record model.

(rest of file omitted).
That’s all we need to create a Ruby gem. The only gem-specific part of the project is in the Rakefile, in the few lines of code related to echoe.
Testing
Now that we’ve written our gem how do we go about testing and publishing it? The answer is to use various rake tasks. As we’re using echoe the first task we want to run is rake manifest.
$ rake manifest
(in /Users/eifion/rails/uniquify)
Cleaning
Building Manifest
+ Manifest
+ README.rdoc
+ Rakefile
+ lib/uniquify.rb
Questo task crea un file Manifest che memorizza l’elenco dei file che saranno inclusi nel nostro gem. Poi possiamo lanciare il rake install per installare il gem nella nostra workstation locale. Una volta installato, apparirà all’interno della lista dei gem della nostra macchina proprio come un qualsiasi altro gem già installato. Possiamo poi includerlo in un’applicazione Rails e testare che funzioni come ci aspettiamo:
This creates a Manifest file that stores a list of the files that will be in our gem. Next we can run rake install to install the gem on our local machine. Once it’s installed it will appear in the list of gems on our machine like any other installed gem. We can then include it in a Rails application and test that it works as we expect.
$ gem list uniquify

*** LOCAL GEMS ***

uniquify (0.1.0)
Pubblicazione
Una volta che abbiamo appurato che il nostro gem funziona correttamente, possiamo pubblicarlo, o su RubyForge o su GitHub. Ci sono una serie di task Rake che ci aiutano in questo. Se abbiamo un account RubyForge, possiamo lanciare:
rake release
per fare la build del gem e inviarlo a RubyForge. Possiamo poi proseguire con:
rake publish_docs
per fare la build e l’upload della documentazione.
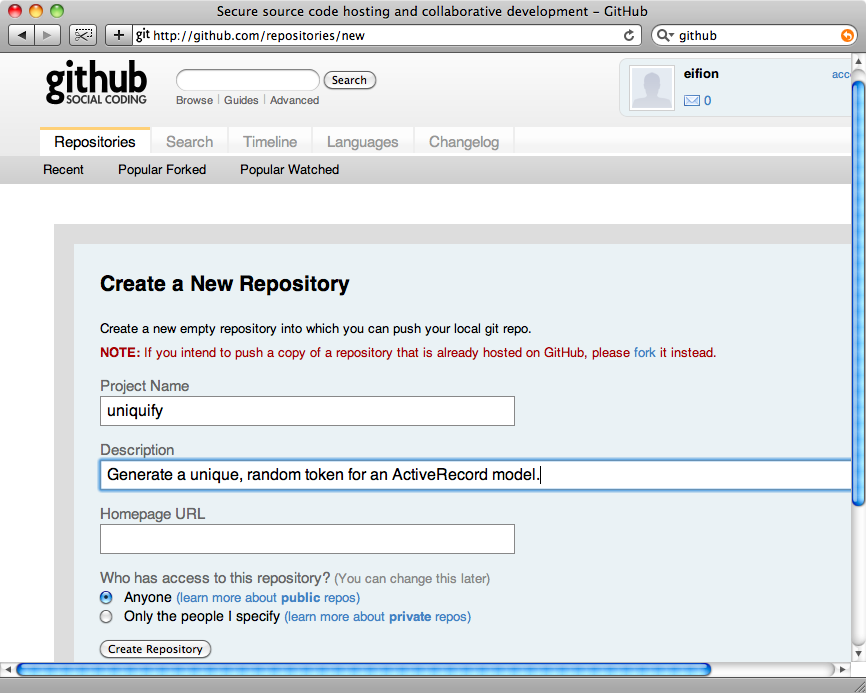
I passi cono lievemente diversi se vorrete pubblicare il tutto su GitHub. Per prima cosa occorre creare un nuovo repository Github:

Poi occorre far diventare la cartella del nostro gem un repository git, il che può essere fatto mediante il lancio di:
git init
Ci sono una serie di cartelle e file che non vorremo condividere, per cui creiamo un file .gitignore per specificarli. Vogliamo ignorare le cartelle pkg e doc e il file Manifest, dal momento che tutti questi sono generati da echoe. Per questo motivo, il nostro file .gitignore apparirà così:
Publishing
Once we know that our gem is working correctly we can publish it, either to RubyForge or GitHub. There are a number of rake tasks that will help us with this. If we have a RubyForge account set up we can run
rake release
to build the gem and upload it to RubyForge. We can then follow this with
rake publish_docs
to build and upload the documentation.
The steps are slightly different if we want to publish to GitHub. First we need to create a new Github repository.

Next we need to turn our gem’s directory into a git repository, which we can do by running
git init
There are some directories and files we don’t want to upload so we’ll create a .gitignore file to define these. We want to ignore the pkg and doc directories and the Manifest file as these are generated by echoe, so our .gitignore file will look like this:
pkg
doc
Manifest
Ora possiamo aggiungere i nostri file al repository e fare il nostro primo commit:
=======We can now add our files to the repository and make our first commit.
>>>>>>> c81ad0f11156510782267dede52d82c62f1ecdea$ git add . $ git commit -m "Initial import" [master (root-commit) cbfe307] Initial import 4 files changed, 57 insertions(+), 0 deletions(-) create mode 100644 .gitignore create mode 100644 README.rdoc create mode 100644 Rakefile create mode 100644 lib/uniquify.rb
Fatto ciò, possiamo aggiungere il nostro repository remoto e fare il push dei file verso di esso:
$ git remote add origin git@github.com:knightq/uniquify.git
$ git push origin master
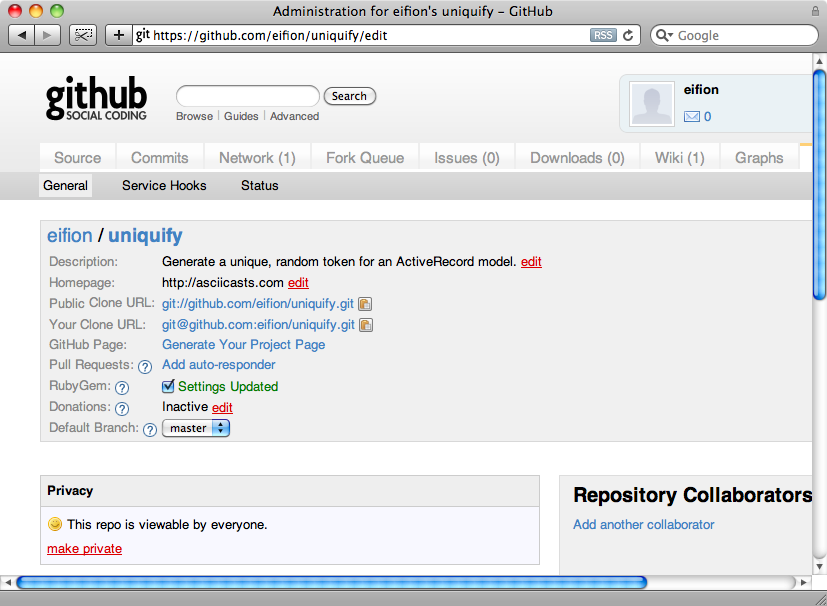
Il nostro progetto è ora su Github, ma ci sono ancora un paio di cose che dobbiamo fare per trasformare il nostro progetto in un gem. La prima è di modificare le impostazioni del progetto e cliccare sul checkbox RubyGem:

Dobbiamo anche creare un file gemspec. Dal momento che stiamo usando echoe, questa parte è semplice, infatti è sufficiente lanciare un task rake:
$ rake build_gemspec
(dalla cartella radice del progetto uniquify)
Gemspec generated
Si noti che il task build_gemspec non compare nella lista dei task prodotta dal lancio del comando rake -T, ciononostante è un task valido. Se ora diamo un’occhiata alla nostra cartella, vi troveremo il file gemspec:
That done we can add our remote repository and push the files to it.
$ git remote add origin git@github.com:eifion/uniquify.git
$ git push origin master
Our project is now on Github but there are a couple of things we need to do to turn our project into a gem. The first is to edit the project settings and click the RubyGem checkbox.

We’ll also need to create a gemspec file. As we’re using echoe this is easy, we just need to run a rake task.
$ rake build_gemspec
(in /Users/eifion/rails/uniquify)
Gemspec generated
Note that the build_gemspec task won’t appear in the list of available tasks when you run rake -T, but it is a valid task. If we look in our directory now we’ll see the gemspec file.
$ ls
Manifest        Rakefile        pkg
README.rdoc     lib             uniquify.gemspec
Per finire, dobbiamo inviare il file gemspec a Github:
=======To finish we’ll need to upload the gemspec file to Github.
>>>>>>> c81ad0f11156510782267dede52d82c62f1ecdea$ git add . $ git commit -m "Adding gemspec file" [master edfcc2f] Adding gemspec file 1 files changed, 30 insertions(+), 0 deletions(-) create mode 100644 uniquify.gemspec $ git push Counting objects: 4, done. Delta compression using up to 2 threads. Compressing objects: 100% (3/3), done. Writing objects: 100% (3/3), 818 bytes, done. Total 3 (delta 1), reused 0 (delta 0) <<<<<<< HEAD To git@github.com:knightq/uniquify.git cbfe307..edfcc2f master -> master
Il nostro progetto può essere ora considerato un gem su Github e dobbiamo solo aspettare un po’ affinchè sia generato il gem.
Questo è più o meno tutto quello che occorre sapere per creare un gem basilare. Via via che svilupperemo il gem, vorremo anche espanderlo e aggiungere file a seconda della necessità. Una buona pratica è di aggiungere un file CHANGELOG per tenere traccia delle modifiche al gem, man mano che si rilasciano nuove versioni.
Il rilascio di una nuova versione del nostro gem è semplice. Tutto ciò che dobbiamo fare è cambiare il numero di versione nel nostro Rakefile e poi lanciare:
rake manifest
seguito da:
rake build_gemspec
Poi possiamo inviare la nostra nuova versione a Github.
Consiglio conclusivo
Chiudiamo l’episodio con un suggerimento. Se vogliamo far funzionare il nostro gem anche come plugin, possiamo farlo, aggiungendo il file init.rb. Basta semplicemente che il file dichiari la dipendenza (require) col nostro gem, utilizzando il nome del file come presente nella cartella lib:
require 'uniquify'
Questo file caricherà la dipendenza ogni volta che viene usato come plugin all’interno di un progetto Rails. Una volta che il file sarà stato aggiunto al repository remoto, potremo lanciare:
script/plugin install git://github.com/knightq/uniquify.git
per installare Uniquify come plugin anzichè come gem.
======= To git@github.com:eifion/uniquify.git cbfe307..edfcc2f master -> masterOur project is now considered a gem on Github and we just have to wait a short while for it to build the gem.
That’s pretty much all we need to do to create a basic gem. As we develop the gem we’ll want to expand on this and add files as necessary. A good practice is to add a CHANGELOG file to keep track of the gem’s changes as we release new versions.
Releasing a new version of our gem is easy. All we need to do is change the version in our Rakefile then run
rake manifest
followed by
rake build_gemspec
We can then upload our new version to Github.
A Final Tip
We’ll wrap this episode up with a tip. If we want our gem to work as a plugin too we can do that by adding an init.rb file. All we need to do in the file is require our gem, using the name of the file in the lib directory.
require 'uniquify'
This will load the file when it’s inserted into a Rails project as a plugin. Once the file has been pushed to your repository we can run
script/plugin install git://github.com/eifion/uniquify.git
to install Uniquify as a plugin instead of a gem.
>>>>>>> c81ad0f11156510782267dede52d82c62f1ecdea

